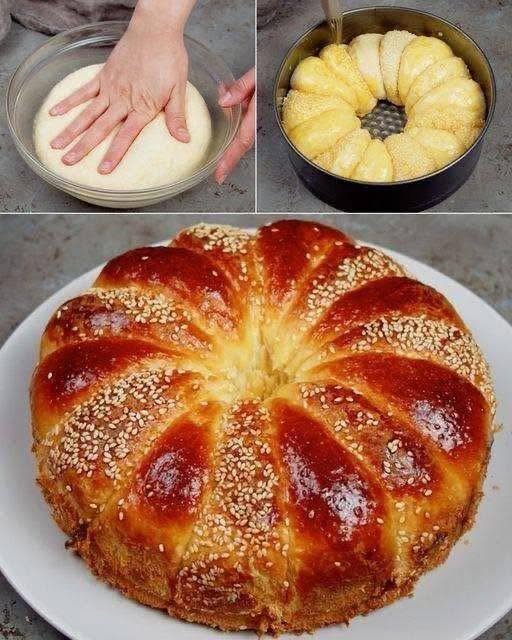
Learn how to make soft and fluffy Japanese Sesame Milk Buns at home with this detailed step-by-step recipe. These tender milk bread buns are enriched with milk, topped with nutty sesame seeds, and perfect for breakfast, snacks, or sandwiches.
Japanese Sesame Milk Buns: Soft, Fluffy, and Irresistibly Delicious
Japanese milk bread is famous for its exceptionally soft texture, delicate crumb, and slightly sweet flavor. These Japanese Sesame Milk Buns take that beloved milk bread concept and transform it into individual rolls crowned with fragrant sesame seeds. The result is a bakery-style bun that stays tender for days and pairs beautifully with butter, jam, soups, or savory fillings.
The secret lies in a rich dough made with milk, butter, and eggs, creating a pillowy texture that is light yet satisfying. Whether you are new to bread baking or an experienced home baker, this recipe will guide you through every step for perfect results.
Preparation Time
- Prep Time: 30 minutes
- Rising Time: 1 hour 45 minutes to 2 hours
- Baking Time: 18–22 minutes
- Total Time: Approximately 3 hours
Yield
- 10–12 buns
Ingredients
For the Dough
- 4 cups (500g) bread flour
- ¼ cup (50g) granulated sugar
- 2¼ teaspoons (7g) instant yeast
- 1 teaspoon salt
- 1 large egg, room temperature
- 1 cup (240ml) warm milk (about 38°C/100°F)
- ¼ cup (60ml) heavy cream
- 4 tablespoons (56g) unsalted butter, softened
For the Egg Wash
- 1 egg
- 1 tablespoon milk
For the Topping
- 2–3 tablespoons white sesame seeds
- 1 tablespoon black sesame seeds (optional)
Equipment Needed
- Large mixing bowl
- Stand mixer with dough hook (optional)
- Measuring cups and spoons
- Baking tray
- Parchment paper
- Kitchen towel or plastic wrap
- Pastry brush
Step-by-Step Directions
Step 1: Activate the Yeast
If using instant yeast, you can mix it directly with the flour. If using active dry yeast:
- Pour the warm milk into a small bowl.
- Add 1 teaspoon of the sugar.
- Sprinkle the yeast over the milk.
- Let it sit for 5–10 minutes until foamy.
A foamy surface indicates that the yeast is active and ready to use.
Step 2: Mix the Dry Ingredients
In a large mixing bowl:
- Combine bread flour, remaining sugar, and salt.
- Whisk together thoroughly to distribute the ingredients evenly.
Keeping the salt separate from direct contact with the yeast initially helps maintain optimal yeast activity.
Step 3: Add the Wet Ingredients
- Add the egg to the flour mixture.
- Pour in the warm milk and heavy cream.
- Mix with a wooden spoon or dough hook until a shaggy dough forms.
At this stage, the dough may appear sticky and uneven. This is completely normal.
Step 4: Knead the Dough
By Stand Mixer
- Knead on medium-low speed for about 5 minutes.
- Add the softened butter one tablespoon at a time.
- Continue kneading for another 8–10 minutes.
By Hand
- Transfer the dough onto a lightly floured surface.
- Knead for 8 minutes.
- Gradually work in the softened butter.
- Continue kneading for another 10–12 minutes.
The dough should become smooth, elastic, and slightly tacky but not excessively sticky.
Windowpane Test
Take a small piece of dough and gently stretch it.
If it stretches into a thin translucent sheet without tearing, the dough is properly developed.
Step 5: First Rise
- Shape the dough into a ball.
- Place it in a lightly greased bowl.
- Cover with plastic wrap or a damp towel.
- Let rise in a warm place for 60–90 minutes.
The dough should double in size.
Step 6: Divide and Shape
- Gently punch down the risen dough to release excess air.
- Transfer it to a clean work surface.
- Divide into 10–12 equal portions.
To shape each bun:
- Flatten a dough portion slightly.
- Pull the edges toward the center.
- Pinch the seams together.
- Turn seam-side down.
- Roll gently under your palm to create a smooth round ball.
This shaping method creates a beautiful bakery-style appearance.
Step 7: Arrange on the Baking Tray
- Line a baking tray with parchment paper.
- Place the dough balls about 2 inches apart.
- Cover loosely with a kitchen towel.
Step 8: Second Rise
- Allow the shaped buns to rise for 45–60 minutes.
- They should become puffy and nearly double in size.
The second rise is crucial for achieving a light and airy texture.
Step 9: Prepare the Egg Wash
In a small bowl:
- Beat together the egg and milk.
- Stir until smooth.
This mixture gives the buns their beautiful golden color.
Step 10: Add Sesame Seeds
- Preheat the oven to 180°C (350°F).
- Gently brush each bun with the egg wash.
- Sprinkle generously with white sesame seeds.
- Add black sesame seeds if desired for contrast.
The egg wash helps the seeds adhere securely during baking.
Step 11: Bake
- Place the tray in the center of the preheated oven.
- Bake for 18–22 minutes.
The buns are done when:
- The tops are golden brown.
- The internal temperature reaches approximately 88–93°C (190–200°F).
- The bottoms sound hollow when tapped.
Step 12: Cool
- Remove the buns from the oven.
- Transfer them to a wire rack.
- Allow them to cool for at least 15 minutes before serving.
Cooling helps the crumb finish setting and improves texture.
Baker’s Tips for Success
Use Bread Flour
Bread flour provides more gluten development, resulting in a softer and chewier bun.
Measure Carefully
For the most accurate results, use a kitchen scale to weigh ingredients.
Do Not Rush the Rising Time
Temperature affects yeast activity. Allow the dough to rise until doubled rather than relying strictly on the clock.
Keep the Dough Soft
A slightly sticky dough produces softer buns than a dry, heavily floured dough.
Store Properly
Store cooled buns in an airtight container at room temperature for up to 3 days.
Serving Suggestions
These sesame milk buns are delicious served with:
- Salted butter
- Honey
- Fruit preserves
- Egg salad
- Chicken sandwiches
- Cream cheese
- Soup and stew accompaniments
Conclusion
Japanese Sesame Milk Buns combine the signature softness of Japanese milk bread with the rich, nutty flavor of sesame seeds. Their cloud-like texture, golden crust, and subtle sweetness make them a versatile addition to any meal. With careful kneading, proper proofing, and a generous sesame topping, you can recreate bakery-quality buns right in your own kitchen.